Proper instrument care and curette maintenance are critical components of veterinary dentistry. Dull instruments not only compromise the quality of dental cleanings but also increase physical strain and the risk of injury to both the patient and the technician. By mastering sharpening techniques and understanding the differences between instrument types and sharpening stones, you can improve efficiency, enhance patient outcomes, and make your work more precise and comfortable.
This blog provides a comprehensive guide to curette maintenance, including the differences between universal and area-specific curettes, proper sharpening angles, the Hu-Friedy sharpening technique, and the unique properties of Arkansas, India, and ceramic stones.
Why Instrument Sharpening Matters
- Improved Efficiency: Sharp instruments remove calculus more effectively, reducing procedure times.
- Enhanced Patient Safety: Dull instruments require more force, increasing the risk of damaging gingival tissues or enamel.
- Reduced Technician Fatigue: Sharper tools minimize hand and wrist strain, reducing the risk of repetitive strain injuries.
- Prolonged Instrument Lifespan: Regular maintenance ensures your tools last longer, saving your practice money.
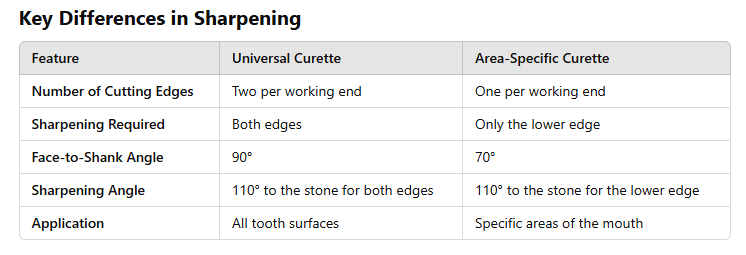
Understanding the Difference Between Universal and Area-Specific Curettes
Curettes are essential tools for subgingival scaling and root planing in veterinary dentistry. While both universal and area-specific curettes are used to remove plaque and calculus, they are designed for different purposes and anatomical areas.
Universal Curettes
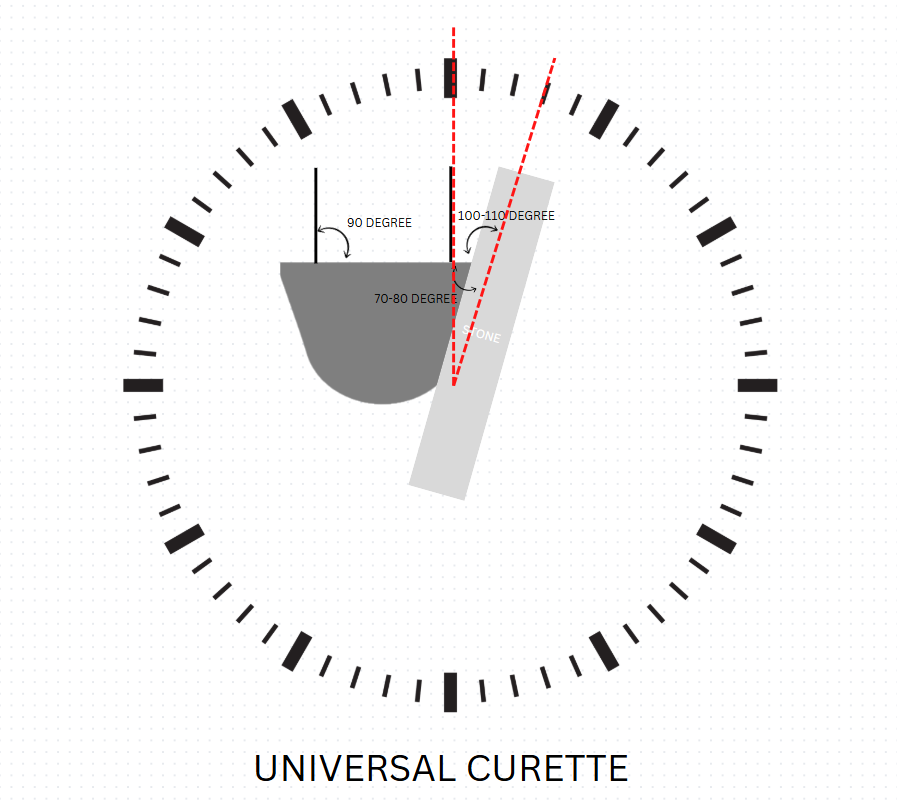
- Design: Universal curettes have two cutting edges per working end, both of which can be used for scaling. The blade is relatively straight, and the face of the blade is at a 90° angle to the terminal shank.
- Purpose: Designed for general use, they can scale and root plane all tooth surfaces, both supragingival and subgingival.
- Versatility: Their ability to work on all surfaces makes them a go-to instrument in many cases, but they may require more effort to adapt to curved or tight spaces.
Area-Specific Curettes (e.g., Gracey Curettes)
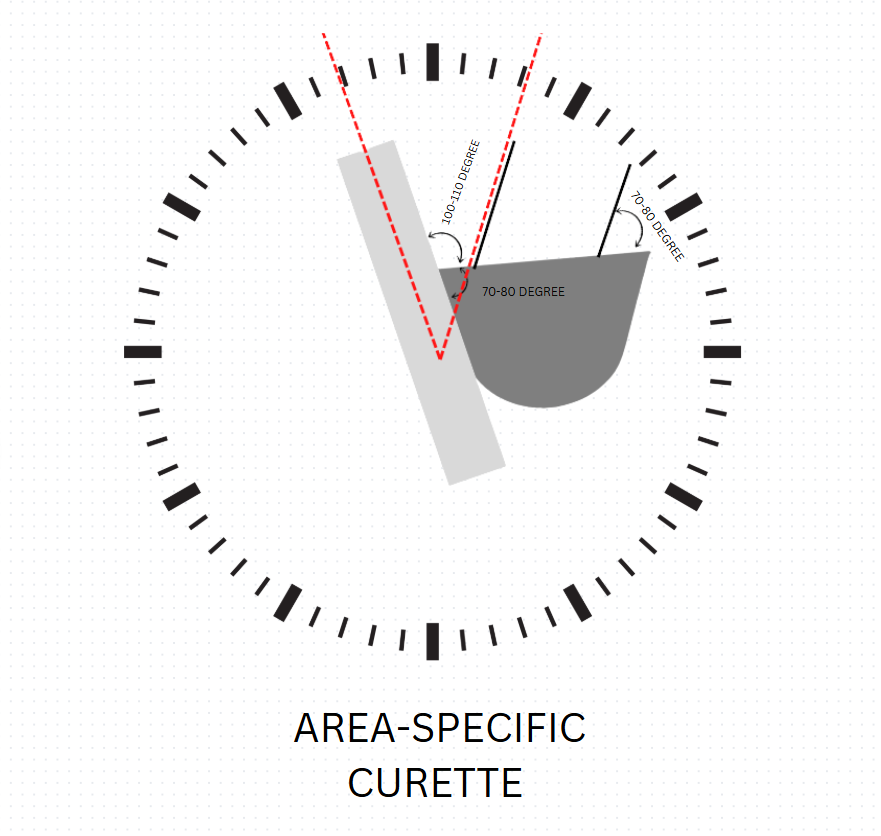
- Design: Area-specific curettes have one cutting edge per working end. The face of the blade is offset at a 70° angle to the terminal shank, allowing for a more precise angle when applied to the tooth surface.
- Purpose: Designed for specific areas of the mouth (e.g., mesial or distal surfaces, anterior teeth). They are particularly effective for deep subgingival pockets and curved surfaces.
- Efficiency: The offset angle reduces tissue trauma and ensures better adaptation to the tooth, but their use is more specialized.
Sharpening Angles for Curettes Using the Hu-Friedy Technique
The Hu-Friedy technique offers a systematic approach to sharpening curettes while ensuring proper angulation.
1. Universal Curettes
- Cutting Edge: Both edges need to be sharpened.
- Sharpening Angle: Hold the blade at a 110° angle to the sharpening stone. The terminal shank should be positioned at 12 o’clock, and the stone should be placed at 3 minutes after noon.
- Technique:
- Hold the instrument in your palm of your non-dominant hand, using your thumb to stabilize it.
- Place the instrument on a stable surface with the face parallel to the ground.
- Position the stone at a 110° angle relative to the face of the blade.
- Move the stone in short, controlled strokes, starting from the heel and progressing to the tip.
- Repeat for the other cutting edge.
- Finish on a down stroke to maintain smoothness and reduce burr formation.
2. Area-Specific Curettes
- Cutting Edge: Only the lower cutting edge needs to be sharpened.
- Sharpening Angle: Hold the blade at a 110° angle to the stone. The terminal shank should be positioned at 3 minutes after noon, while the stone should be placed at 3 minutes before noon.
- Technique:
- Hold the instrument in your palm in your non-dominant hand (this example is for right-handed individuals. Use the opposite technique if you are left-handed), ensuring the toe points towards you for odd-numbered curettes (e.g., Gracey 5) and away from you for even-numbered curettes (e.g., Gracey 6).
- Position the stone at a 110° angle to the cutting edge.
- Use short strokes, starting from the heel and moving to the toe.
- Finish with a down stroke to remove any burrs and maintain the cutting edge.
Toe Sharpening for Curettes
To keep the toe round and functional:
- Use a gentle sweeping motion with the stone to maintain its curved shape.
- Rotate the stone slightly while moving along the toe’s edge.
- Ensure the toe remains rounded rather than pointed, as a pointed curette can cause tissue trauma.
Understanding Sharpening Stones
Choosing the right sharpening stone is critical for effective curette maintenance. Here’s a breakdown of the most commonly used stones in veterinary dentistry: Arkansas, India, and ceramic stones.
1. Arkansas Stones
- Material: Made from natural novaculite, a fine-grained, dense mineral.
- Texture: Available in different grades (soft, hard, and translucent). Translucent Arkansas stones are the finest and ideal for polishing.
- Use: Best for finishing and refining an already sharp edge. They produce a razor-sharp finish but work more slowly than synthetic stones.
- Lubrication: Requires oil to reduce friction and prevent metal particles from clogging the surface.
- Best For: Technicians looking for a smooth, polished edge with minimal material removal.
- Limitations: Less effective for significantly dull or damaged instruments due to their fine grit.
2. India Stones
- Material: Made from aluminum oxide, a synthetic material known for its hardness.
- Texture: Coarse, medium, and fine grits available. Coarse stones remove material quickly, while fine stones refine the edge.
- Use: Ideal for re-sharpening very dull instruments or reshaping blades. They are more aggressive than Arkansas stones.
- Lubrication: Requires oil to maintain efficiency and prevent clogging.
- Best For: Restoring sharpness to instruments that have been neglected or heavily used.
- Limitations: Coarser stones may leave a less polished finish, so follow up with a finer stone.
3. Ceramic Stones
- Material: Made from synthetic ceramic materials, known for their hardness and durability.
- Texture: Typically medium to fine grit, though some ultra-fine options are available.
- Use: A versatile option suitable for both routine sharpening and finishing. Unlike Arkansas and India stones, ceramic stones don’t require lubrication, making them low maintenance.
- Best For: Daily maintenance and refining edges between major sharpenings.
- Limitations: While convenient, they may not remove material as quickly as India stones or polish as finely as Arkansas stones.
Choosing the Right Stone
- Routine Maintenance: Use ceramic stones for quick touch-ups and maintaining sharpness.
- Restoring Sharpness: For dull or damaged instruments, start with a medium-grit India stone to re-establish the edge and follow with an Arkansas or ceramic stone for refinement.
- Polishing and Finishing: Use a fine or translucent Arkansas stone to achieve a smooth, polished edge.
Common Sharpening Mistakes to Avoid
- Using the Wrong Stone: Choose the correct stone based on the instrument’s condition and the level of sharpness needed.
- Improper Angling: Sharpening at too steep or shallow an angle compromises the edge.
- Skipping Curette Maintenance: Waiting until instruments are very dull requires aggressive sharpening, reducing their lifespan.
- Neglecting Lubrication: For Arkansas and India stones, skipping lubrication can clog the stone and make sharpening less effective.
Storage and Curette Maintenance Tips
- Store sharpened instruments in a designated tray or case to avoid dulling the edges.
- Clean stones regularly to prevent clogging and ensure smooth sharpening.
- Sharpen instruments after every few uses to maintain efficiency and precision.
Conclusion
Understanding the differences between universal and area-specific curettes, along with the unique properties of Arkansas, India, and ceramic stones, can elevate your sharpening technique and ensure your dental instruments remain in optimal condition. The Hu-Friedy technique provides a structured approach to maintaining ideal angulation and sharpness. Each stone and instrument type has its strengths, and using the right combination will maximize efficiency, protect your health, and enhance the quality of care you provide.
For a more visual learning experience, consider adding step-by-step photos or diagrams to your sharpening routine. If you’d like a demonstration or additional resources, don’t hesitate to reach out—your tools (and patients) will thank you!
Images used under creative commons license – commercial use (02/05/2025) Photo by Ozkan Guner on Unsplash